


Chrome OS is a stable operating system that receives regular updates from Google. Most of the time, this happens in the background without distracting you from whatever you're using a Chromebook for. Unlike other operating systems, Chrome OS does not perpetually nag to update.
Despite it's stability, peace of mind can be taken from the knowledge that safety exists in having a pre-prepared recovery USB drive. Just in case the worst case scenario does happen.
In this tutorial, I shall show you how to create a Chrome OS USB recovery drive using Chrome OS as the operating system to create the USB drive.
Google Chrome Recovery Utility
For the purposes of creating a Chrome OS USB recovery drive, Google provides a Recovery Utility app.
Before You Start
Before you start, it's best to be prepared. You'll need the following:
- A spare USB drive, minimum 4GB
- A computer running Chrome OS
How to Create a Chrome OS Recovery Drive
1. Download the Recovery Utility


Boot up the Chrome OS computer, open Chrome, navigate to the Chrome Web Store and download the Chromebook Recovery Utility.
2. Open the Utility


Add the Recovery Utility to Chrome and launch it.
You'll need a spare 4GB USB drive that will be erased during the process. Alternatively, if the Chromebook has an SD card slot, you can use an SD Card for the recovery media.
3. Identify the Chromebook


Identify the destination Chromebook. You can do this using the Chromebook identification code, or you can select the make and mode from a list.
In this case, Chromebook means any machine that runs Chrome OS. It means Chromebox desktops as well as Chromebook laptops.


For instance, I created the recovery media for a Chromebook Pixel using a Lenovo ThinkCentre running Chrome OS.
4. Insert the USB Drive


If you have already inserted the USB drive or SD Card, select it from the list. If you have not yet inserted the recovery media, do it now and ensure that it is correctly selected.
5. Create the Recovery Image
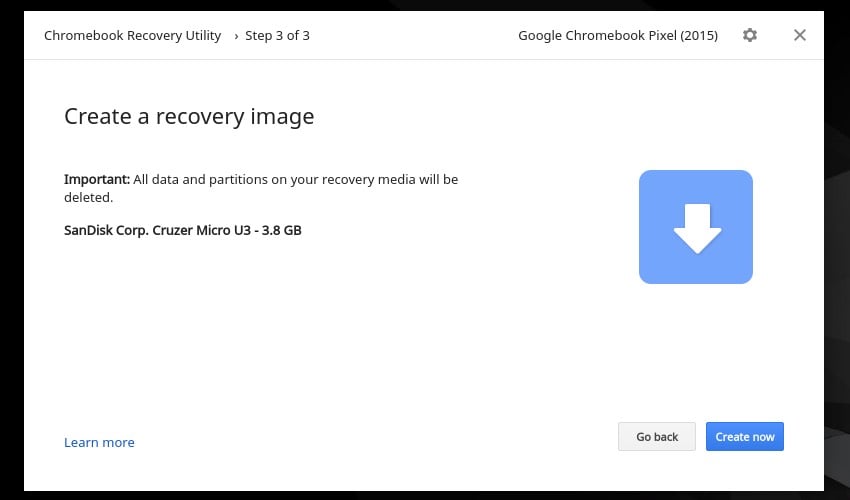


Double check that you've selected the correct USB or SD media as it will be permanently deleted. Once you've checked and selected the correct drive, click the blue Create Now button.


The utility will go through the steps of creating the recovery image on the USB drive or SD Card.
This process will take a few minutes, so it's best to go and have a cup of tea. Don't interrupt the process by closing the application or turning off the computer.
6. Remove the USB Drive


The utility will let you know when the process is complete. Eject the USB drive or SD Card and label it clearly.
Keep the recovery USB drive or SD Card in a safe place, just in case you need it in the future.
When to Use the Chrome OS Recovery Drive
Once the USB Recovery Drive has been created, label it and store it somewhere safely.
1. Identify the Problem
If the Chromebook ever shows the message Chrome OS is missing or damaged. Please insert a recovery USB stick or SD card, then you'll be safe in the knowledge that you have a prepared by creating a recovery USB drive.
2. Power Down
Power down the device. Plug in the recovery drive
4. Insert the ChromeOS USB Recovery Drive
Insert the Chrome OS USB recovery drive into a spare USB port on the Chromebook.
5. Power Up
Insert the recovery media, USB drive or SD Card, that you created earlier and follow the on-screen instructions.
Conclusion
Better to be safe than sorry. Whilst computers in general, and Chromebooks specifically, are pretty reliable these days, there's no telling when something may go awry.
Investing a few minutes creating recovery media will pay dividends in the long run should it be required in restoring an ailing Chromebook.
 By
By


